Oct 25, 2009

Running GIMP Python plugins in batch mode

In the previous entry I wrote about creating GIMP plugins in Python. This follows up on that by showing the bit of magic for running one of these plugins in batch mode from the command line. You need to provide values for each positional parameter defined for the plugin. It helps if the plugin has been designed with batch mode in mind.
gimp -ib '(python-fu-mylogo-batch RUN-NONINTERACTIVE "in.jpg" "out.jpg" "Made by me" 50 "Sans" 24)(gimp-quit 1)'
The language used is TinyScheme, I don't know how to use Python in this mode, but it matters very little. Any function defined in the PDB can be called including of course Python functions. Add --verbose to the command line to see the execution flow. As a side note, you can use the following command to start the PDB browser directly without going through the GIMP UI:
gimp -ib '(plug-in-dbbrowser RUN-INTERACTIVE)(gimp-quit 1)'

To make a batch mode function, add a function that opens the image, calls the main plugin function and then saves the result. Register this function also, probably under "<Image>/Tools" this time.
def mylogo_batch(infile, outfile, text, opacity, fontname, fontsize):
img = pdb.gimp_file_load(infile, infile)
pdb.python_fu_mylogo(img, text, opacity, fontname, fontsize)
pdb.gimp_image_flatten(img)
drawable = pdb.gimp_image_get_active_layer(img)
pdb.gimp_file_save(img, drawable, outfile, outfile)
pdb.gimp_image_delete(img)

The batch plugin can be invoked from the UI also, a file selection dialog will prompt the user to choose the input and output and so on.

Sep 18, 2009

Writing GIMP 2.6 Python plugins

The GIMP now has Python support in addition to TinyScheme, allowing you to harness the power of GIMP in Python. The following is a simple logo plugin written in Python, usable as a template to write more complex ones. The plugin writes a logo in the bottom-right corner of your image.

#!/usr/bin/python

from gimpfu import *

gettext.install("gimp20-python", gimp.locale_directory, unicode=True)

def mylogo(img, text, opacity, fontname, fontsize):
  gimp.context_push()
  color = (255,255,255)
  pdb.gimp_context_set_foreground(color)
  logo_layer = pdb.gimp_text_fontname(img, None, 0, 0, text, 0, 1,
   fontsize, POINTS, fontname)
  pdb.gimp_layer_set_opacity(logo_layer, opacity)
  x = img.width - logo_layer.width
  y = img.height - logo_layer.height
  pdb.gimp_layer_translate(logo_layer, x, y)
  gimp.context_pop()

register(
  "python-fu-mylogo",
  N_("Add logo to image"),
  "Adds a logo to the bottom-right corner of the image.",
  "", # author name
  "", # copyright owner
  "2009-09-18", # date
  N_("Add logo..."), # text to show in menu
  "RGB*, GRAY*", # image types we can work with
  # Positional parameter definitions, each entry in this format:
  # (TYPE, "name", "caption", default, ...)
  [
    (PF_IMAGE, "image", "Input image", None),
    (PF_STRING, "text", _("Text"), _(u"\xa92009")),
    (PF_SLIDER, "opacity", _("Opacity"), 50, (0,100,1)),
    (PF_FONT, "fontname", _("Font"), "Sans"),
    (PF_INT, "fontsize", _("Size"), 24),
  ],
  # Return values list
  [],
  mylogo, # function name
  # Where to add in menu structure
  # Special tag <Image> indicates you must have an open image
  menu="<Image>/Filters/Render",
  domain=("gimp20-python", gimp.locale_directory)
)
main()

Write ~/.gimp-2.6/plug-ins/mylogo.py and make sure it is executable, or GIMP will ignore it! After restarting GIMP and opening an image file, you will be able to invoke "Add logo..." from the Filters/Render submenu.

All the functions you can use to manipulate an image are in the "Procedural Database", accessible in Python as methods of the pdb object. The list of functions and their documentation can be found using procedure browser: Filters / Python-Fu / Console, click "Browse...". Just remember that the Python names have underscores instead of dashes as illustrated in the code above.

You will also find your own plugins there (search for "mylogo").

References:

May 28, 2009

Fixing yum for older Fedora installations

On an old Fedora system (say Core 5 or 6), you may encounter this problem:

# yum list kernel
Setting up repositories
Error: Cannot find a valid baseurl for repo: core

For releases that have reached EOL (end of life), this happens because their repositories are no longer available on the Fedora Public Active Mirrors system.

They are, however, still available in the archives. The solution is to update the yum repository configuration to use the archives instead of the now nonfunctional mirrorlist.

# cd /etc/yum.repos.d/
# ls
fedora-core.repo fedora-updates.repo fedora-extras.repo

There may be more files there, but those are the ones you need to change. Edit each of the above files and go to the first section, called [core], [updates] and [extras], respectively. You don't need to bother with the other sections, as they have "enabled=0" so they are not normally used. Comment out mirrorlist (and existing baseurl, if not already done) and add a new baseurl line, as shown below (the additions are shown in darker color):

fedora-core.repo
[core]
name=Fedora Core $releasever - $basearch
#baseurl=http://download.fedora.redhat.com/pub/fedora/linux/core/$releasever/$basearch/os/
#mirrorlist=http://fedora.redhat.com/download/mirrors/fedora-core-$releasever
baseurl=http://archives.fedoraproject.org/pub/archive/fedora/linux/core/$releasever/$basearch/os

fedora-updates.repo
[updates]
name=Fedora Core $releasever - $basearch - Updates
#baseurl=http://download.fedora.redhat.com/pub/fedora/linux/core/updates/$releasever/$basearch/
#mirrorlist=http://fedora.redhat.com/download/mirrors/updates-released-fc$releasever
baseurl=http://archives.fedoraproject.org/pub/archive/fedora/linux/core/updates/$releasever/$basearch/

fedora-extras.repo
[extras]
name=Fedora Extras $releasever - $basearch
#baseurl=http://download.fedora.redhat.com/pub/fedora/linux/extras/$releasever/$basearch/
#mirrorlist=http://fedora.redhat.com/download/mirrors/fedora-extras-$releasever
baseurl=http://archives.fedoraproject.org/pub/archive/fedora/linux/extras/$releasever/$basearch/


You may need to run "yum clean all" afterwards to remove the old data from the yum cache.

Mar 29, 2009

Aquarium CO2 Injection

All plants need CO2 (carbon dioxide). During photosynthesis, they break down CO2 into carbon, which they use to grow, and oxygen, which they release. In an aquarium the CO2 comes from fish respiration and a small amount mixes in from the air at the surface. This isn't usually enough for a densely planted tank or for high light plants which demand a lot of CO2 to be able to use the light. Without CO2 they wither and die or be overrun by algae.

There are two methods for adding CO2 to a tank. The DIY method involves using yeast to break down sugar and produce CO2 in a plastic bottle. This is cheap but its output cannot be controlled and is relatively high maintenance (need to replace sugar and yeast every couple of weeks).

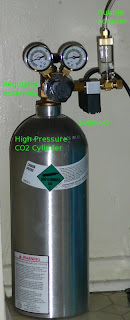
The other way is to use a pressurized CO2 container. This requires little maintenance as you only need to refill the container maybe once a year, the rest is just occasional monitoring. The cost, around $250 in 2008 dollars. The parts you need for a fully automated system are the following:

CO2 Cylinder with Regulator AssyCO2 tank. Holds liquid CO2 at high pressure. A 5lb or 10lb tank is good enough (the weight refers to how much liquid CO2 they contain). An aluminum tank won't rust and is lighter. To (re)charge, find a welding gas supply store in your area and take it there. Cost to recharge is around $10-$15 for a 5lb container.

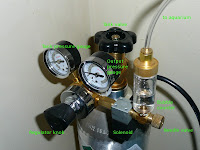
Regulator. Screwed into the tank (have some teflon tape on hand), is a manual valve that releases the gas little by little so it can be used, as you can't just dump it at the 1500psi tank pressure. You want one with two gauges, one measures the bottle pressure so you can tell when it's near empty, and the other the output pressure. A common regulator is the Milwaukee MA957 which comes with the solenoid and bubble counter as well.

MA957 Regulator AssemblySolenoid. It's an electric valve hooked to the regulator output, that turns CO2 on and off completely. It is usually triggered by the pH controller (see below).

Bubble counter. Visualization device, allows you to "measure" the amount of CO2 you are dumping in the tank. It is just a tiny bottle half-filled with water that the CO2 bubbles through. There's also a needle valve used to fine-tune the flow (but the main control is the regulator).

A few feet of CO2-safe tubing (CO2 makes some tubes brittle after a while)

Diffuser or "reactor", sits in the tank at the end of the CO2 tube, makes sure the gas is dissolved in the water and not wasted in the atmosphere. There are many kinds. You can also dump the CO2 in the filter intake. I use a small Aqua Medic ceramic CO2 diffuser that makes very fine bubbles that dissolve faster. The principle of most reactors is to make the bubbles run along a long path on their way up. You can see the bubble get smaller as the gas dissolves but some of it still escapes at the end.

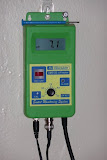
SMS122 pH ControllerpH controller uses a probe in the tank to measure the pH level and turns the solenoid on and off to control the CO2 release into the tank. It also displays the current pH level. The controller is a critical part of the system, you need this because CO2 dissolved in water makes it acidic (lowers pH). At night plants stop using CO2 and the pH would otherwise drop and kill the fish. The Milwaukee SMS122 pH controller is a good option and works together with the MA957 regulator.

Notes

Measure the water's pH and hardness (kH and gH). For plants you want a relatively low pH, 7.0 or a bit lower if your fish can tolerate it. Do check against the pH range for all your fish. Change in small steps as fish do not tolerate large pH changes well. Don't just set the controller to 7 if your water is 8.

Plants won't grow well (or at all) in very hard water, even with a normal pH. Water should be softened a bit but try to avoid buffers (they alter the chemistry in a way that makes it difficult to measure things).

Set the regulator and needle valve to the lowest flow that keeps your pH in balance. This is better for the fish (avoids a quick pH change) and if the controller malfunctions it will give you more time to catch it before creating a dangerous pH level in the aquarium.

Try to avoid hang-on-tank filters or anything that agitates the water surface, the dissolved CO2 will be lost by dissipating into the atmosphere easier.

Safety notes

The tank contains gas under high pressure (1500psi or higher). Must be handled with caution. Do not let it get hot, that causes its pressure to rise and the safety valve all tanks are equipped with may break open and dump all the gas instantly. You do not want this to happen in your car while you're driving.

A smaller CO2 tank (5lbs) is easier to work with, easy to carry and is safer than the bigger tanks should all the gas be released in the room by accident. Secure the tank upright while in operation and ensure it cannot be toppled over, as the liquid CO2 will flow through and may cause damage to the regulator, other components or the fish tank. It can be transported in any position but when used it must sit upright.

Links, references:

Jan 29, 2009

Choosing a Microscope

Following are the specs I have found worth looking for when choosing a biological microscope for serious hobby. This is a summary of what I gathered reading about this on the net, and many explanations have been left out for brevity. I do not address the question of buying used or new, specs only.

Head

A trinocular head has binocular eyepieces (less strain on the eyes, better view) and a center port for a camera. Must be parfocal so the image remains in focus when switching between camera and eyepieces. You might also need one with diopter correction.

Couldn't find much about different head types, but it appears one of the better ones is the Siedentopf head where eyepieces rotate to adjust distance, as opposed to a slider type. Check interpupillary distance specs to make sure it works for you. Vertical angle is 30 degrees which is more comfortable than the 45 some have. Ergo is a more advanced type allowing vertical angle adjustment (such as in the Meiji TL5000) but is not found in any affordable scopes yet.

There are two basic camera adapter types: C-mount for digicams and T-mount (42mm) for SLRs. Can't tell much except that you will need adapters on top of those, optical if you're unlucky.

Eyepieces

You want 10x eyepieces, Wide Field or Super Wide Field (18, 20 or 22mm). For reference, the standard 10x have 13mm field of view. Do not bother with 16x or 20x eyepieces, they provide "empty magnification*". Imagine a slide projector, you can make the image bigger but not more detailed. The objective provides the detail, the eyepiece just magnifies it.

*) According to Micrographia, higher-power eyepieces can still provide useful magnification for high NA objectives and are also good for people of lower visual acuity. A rule of thumb is that the maximum achieveable magnification is about 1000 times the NA of the objective, so objectives in a perfectly configured optical system are capable of more detail than seen with a 10x eyepiece. [note added Feb 8, 2009].

High-eyepoint eyepieces allow viewing from a more comfortable distance, and are good for eyeglass-wearers (they are sometimes marked with an eyeglass symbol).

Nosepiece

The nosepiece is where the objectives are screwed into. You want a reversed nosepiece (facing the back) so the objectives aren't in the way while working on the stage and are safe from smudging. Should have room for 4 or 5 objectives, the more the better because you have more objectives to use at once without having to unscrew and replace some. Other features to look for are ball bearing, positive click stops, knurled ring.

Objectives

The objective is the most important part, because its NA (Numerical Aperture) is a critical factor in the final resolution of the image. These are the common types:
  • achromats are the standard achromatic objectives;
  • semi-plan (or so-called "flat field") provide a flatter field of view but how flat is usually unspecified;
  • Plan achromats keep the focus plane in the entire image, usually twice the price of regular achros;
  • apochromats are best but very expensive.
You want Plan. Objectives must match the MTL, see below. Common sizes are 4x, 10x, 20x, 40xr, 100xr (requires oil). 60xr is less common but provides highest dry resolution (NA 0.85+). The "r" marking means "retractable" or "spring", it is found in the higher-power objectives so they do not cause damage when they bump into slides accidentally, as their working distance is fractions of a millimeter. Objectives with NA around 1 and higher require a higher refraction index medium, such as oil or water, between them and the slide. The rest that don't are called "dry".

Unless you're buying into a particular vendor, you want standard DIN objectives. This refers to the mounting thread specs. Also you want the set to be parfocal, the usual parfocal distance is 45mm. This is the distance from the base of the objective to the slide when the image is in focus. Parfocality allows switching from objective to objective without losing focus.

Some objectives are antifungal treated.

Stage

You want a (large) mechanical stage (the stage moves not the head) with more ergonomic coaxial fine and coarse focus, tension adjustment to avoid creep and a stage stop to prevent the stage from running into the objectives. Low horizontal x/y stage movement knob and vernier scales for noting position. Anti-scratch coating is needed (ceramic coating is best but rare).

All-metal gears are better than plastic especially for continuous use or long-term ownership prospects, but few mention this in their specs.

Illumination

An "Abbe" condenser of NA 1.25 is the basic type. Swing-out type allows insertion/removal of one lens to cover more field at 4x. An Achro (achromatic, aplanatic) condenser with NA 0.7-0.8 is better for dry objectives but harder to find.

Köhler/Koehler illumination includes a field diaphragm and centerable light source to provide uniform lighting for best results. This is usually found in higher-end scopes. If it has Köhler, it probably has most of the features on this page.

Standard light is a 20W halogen with variable brightness. Others have LED. No standard (tungsten) incandescent (too hot and not enough light).

Phase Contrast

Many specimens are almost transparent thus difficult to see in brightfield without careful staining. Phase Contrast is a technique that provides much better contrast and allows viewing even of transparent specimens. Most microscopes today are modular so adding Phase Contrast should be a matter of getting the necessary kit.

There are two options as far as component set. The Zernike Turret Phase kit, which adds $600+ to the price, comes with a turret-style condenser. Simple phase using slide-in filters is cheaper but not as easy to use as you have to swap filters when changing powers. Both use special Phase objectives, inscribed "PH" or "Phase" with standard 10x, 20x, 40x and 100x magnifications. Phase objectives can also be used for regular brightfield work, but brightfield objectives do not work for phase.

The Zernike Phase turret has six slots named BF (BrightField), DF (DarkField), PH1, PH2, PH3, PH4 and comes with a dedicated Phase condenser. The PH slots are one for each objective because the annulus (circular) filters in the turret and the objective are part of the phase optical system and must match.

Other relatively accessible methods for improving contrast that I learned of:
  • Dark field. Dry is not that useful. Oil dark field is much better, but messy and still not better than phase;
  • DIC (differential interference contrast) produces an "embossed" image with great contrast, but is rather expensive
  • Polarization. This can be done with a couple polarizer filters but I do not know what kind of image it produces. Dedicated polarizer scopes have a different, circular and rotatable, stage.
MTL

The optical system of a microscope is built around a certain MTL (Mechanical Tube Length) which is where the objective projects the virtual image. New objectives and eyepieces need to have the same MTL for best results. So keep that in mind when choosing the microscope.
  • 160mm MTL I found is most common - buy that.
  • 170mm is also found in some scopes.
  • "Infinity-corrected optics" (marked ∞) is the latest tech, these allow adding other elements in the optical path without introducing aberrations. It is said however that you cannot mix and match eyepieces and objectives from different vendors due to a lack of standardization.
Useful resources
Jan 25, 2009

Polishing a resin piece to a glossy finish


You just removed your latest resin creation from the mold. It does not look exactly how you expected it. Wanted a shiny glass cylinder. Got a beat up dull plastic puck. Here's how to fix it.

Tools needed:

  • Fine metal file (for correcting shape);
  • Sandpaper, from coarse to fine: 100 grit, 240 grit, 600 grit (and 1000 if you can), preferrably waterproof. Home Depot has up to 600 grit and is cheap. Auto stores should have 1000;
  • Power drill (or buffer tool);


  • Buffing kit: 4" cotton buffing wheel and "White Rouge" compound. Home Depot has a "Ryobi 8-piece Mini Buffing Kit" for $10 (part# A01AG08) with everything you need for a standard power drill - comes with two "White Rouge" sticks as seen on the right and the buffing wheel attached to the drill above.

First, wait until the resin is fully cured (a week is good).

Know that filing or polishing resin produces a fine dust which is best not inhaled. Do your own research and protect yourself according to your tolerance, but my guess is whatever you wore while casting should work. I'd either use a particulate mask (but still have a mess to clean up afterwards) or work near a sink and wet everything so there's no airborne dust (that's the reason for the waterproof sandpaper). The advantage of wet sanding is also a finer finish and easier removal of accumulated debris while sanding. Do not wet buffing wheel!

File away unneeded material and correct the shape of the object. Careful not to chip sharp corners. Flat surfaces are best handled by laying the coarse (100-grit) sandpaper on the table and running the piece over it in circular motions while applying equal pressure on the object. Don't get carried away and don't use too much pressure, sandpaper eats resin fast. Most of the shaping should be done with the coarsest grit.

Next, use 240-grit sandpaper to finalize the shape, applying less pressure. You can do some fine edge beveling too. Then move to progressively finer sandpaper to prepare it for buffing. All the surfaces that you want glossy must be done with the finest grit (600 or 1000) or you'll have hard-to-remove deep scratches afterwards.

Here's how the dry item looks after the sanding with the different papers. When wet it looks a lot more translucent, it gets duller when dry. The 600-grit results in a nice "frosted" finish very soft to the touch, good if you don't need to see through it, otherwise still not so great.

Now that the piece is in its final shape and has been dried, we need to make the glossy surfaces. Install the buffing wheel on the drill according to instructions that came with the kit. The buffing compound is a very fine abrasive paste which, when attached to the buffing wheel fibers hitting the object many times at high speed, flattens the microscopic peaks left over from sanding. It does not have a lot of grinding power though, which is why we had to use the fine sandpaper first. I used the "White Rouge" compound which is recommended for plastics.

Find the best position you can hold the drill still with one hand for long periods with your face not in the way of the stream of abraded particles, nor in the plane of rotation of the wheel (fibers or other things may detach at any moment and in any direction). A pair of goggles could complete the outfit. You might also need a pair of ear plugs if your drill is as loud as mine, you'll need to use it for longer than usual and the shrieking noise might make your ears ring for a while afterwards.

While the buffing wheel is at speed, load it with just a little bit of the compound - touch the edge of the wheel with the White Rouge stick just a second or two. You'll know you put too much if you see a white waxy "scum" accumulate on the object as you push the wheel onto it. Hold the drill still while moving the object around, touching the edge of the spinning wheel. You should see the surface starting to get a mirror finish right away. The wheel is not effective without the compound so you need to add more as you work. Always add a little bit, and only to the edge of the wheel, not the object.

Caution: always hold the object or the stick leaned towards the direction the wheel is spinning to avoid having it (or worse, the drill) knocked out of your hand and launched across the room or into your face.

Don't press too hard or the resin will heat up and melt. If you feel the object getting warm, let off the pressure. The important factor is the linear speed of the wheel edge, so you can also use a smaller wheel if your drill is too fast.

That's it!