All plants need CO
2 (carbon dioxide). During photosynthesis, they break down CO
2 into carbon, which they use to grow, and oxygen, which they release. In an aquarium the CO
2 comes from fish respiration and a small amount mixes in from the air at the surface. This isn't usually enough for a densely planted tank or for high light plants which demand a lot of CO
2 to be able to use the light. Without CO
2 they wither and die or be overrun by algae.
There are two methods for adding CO
2 to a tank. The DIY method involves using yeast to break down sugar and produce CO
2 in a plastic bottle. This is cheap but its output cannot be controlled and is relatively high maintenance (need to replace sugar and yeast every couple of weeks).
The other way is to use a pressurized CO
2 container. This requires little maintenance as you only need to refill the container maybe once a year, the rest is just occasional monitoring. The cost, around $250 in 2008 dollars. The parts you need for a fully automated system are the following:
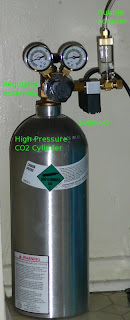 CO2 tank
. Holds liquid CO
2 at high pressure. A 5lb or 10lb tank is good enough (the weight refers to how much liquid CO
2 they contain). An aluminum tank won't rust and is lighter. To (re)charge, find a welding gas supply store in your area and take it there. Cost to recharge is around $10-$15 for a 5lb container.
Regulator. Screwed into the tank (have some
teflon tape on hand), is a manual valve that releases the gas little by little so it can be used, as you can't just dump it at the 1500psi tank pressure. You want one with two gauges, one measures the bottle pressure so you can tell when it's near empty, and the other the output pressure. A common regulator is the Milwaukee MA957 which comes with the solenoid and bubble counter as well.
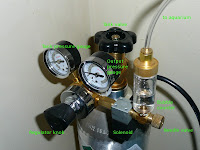 Solenoid
. It's an electric valve hooked to the regulator output, that turns CO
2 on and off completely. It is usually triggered by the pH controller (see below).
Bubble counter. Visualization device, allows you to "measure" the amount of CO
2 you are dumping in the tank. It is just a tiny bottle half-filled with water that the CO
2 bubbles through. There's also a needle valve used to fine-tune the flow (but the main control is the regulator).
A few feet of
CO2-safe tubing (CO
2 makes some tubes brittle after a while)
Diffuser or "
reactor", sits in the tank at the end of the CO
2 tube, makes sure the gas is dissolved in the water and not wasted in the atmosphere. There are many kinds. You can also dump the CO
2 in the filter intake. I use a small Aqua Medic ceramic CO
2 diffuser that makes very fine bubbles that dissolve faster. The principle of most reactors is to make the bubbles run along a long path on their way up. You can see the bubble get smaller as the gas dissolves but some of it still escapes at the end.
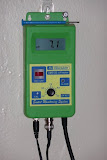 pH controller
 uses a probe in the tank to measure the pH level and turns the solenoid on and off to control the CO
2 release into the tank. It also displays the current pH level. The controller is a critical part of the system, you need this because CO
2 dissolved in water makes it acidic (lowers pH). At night plants stop using CO
2 and the pH would otherwise drop and kill the fish. The Milwaukee SMS122 pH controller is a good option and works together with the MA957 regulator.
NotesMeasure the water's pH and hardness (kH and gH). For plants you want a relatively low pH, 7.0 or a bit lower if your fish can tolerate it.
Do check against the pH range for all your fish. Change in small steps as fish do not tolerate large pH changes well. Don't just set the controller to 7 if your water is 8.
Plants won't grow well (or at all) in very hard water, even with a normal pH. Water should be softened a bit but try to avoid buffers (they alter the chemistry in a way that makes it difficult to measure things).
Set the regulator and needle valve to the lowest flow that keeps your pH in balance. This is better for the fish (avoids a quick pH change) and if the controller malfunctions it will give you more time to catch it before creating a dangerous pH level in the aquarium.
Try to avoid hang-on-tank filters or anything that agitates the water surface, the dissolved CO
2 will be lost by dissipating into the atmosphere easier.
Safety notesThe tank contains gas under high pressure (1500psi or higher). Must be handled with caution. Do not let it get hot, that causes its pressure to rise and the safety valve all tanks are equipped with may break open and dump all the gas instantly. You do not want this to happen in your car while you're driving.
A smaller CO
2 tank (5lbs) is easier to work with, easy to carry and is safer than the bigger tanks should all the gas be released in the room by accident. Secure the tank upright while in operation and ensure it cannot be toppled over, as the liquid CO
2 will flow through and may cause damage to the regulator, other components or the fish tank. It can be transported in any position but when used it must sit upright.
Links, references:


 Posts
Posts

